Sunday, August 28, 2016

Derpy Snail

So here's my latest, a derpy snail thing.  His body was originally sculpted in CX-50, then cast in resin, coated in polymer clay.  He's pretty translucent, although I regret how clear his hands are, they're hard to make out against his body.

The slime trail is resin.  It ended up about 5 times longer than I originally intended, but ah well.  Works pretty well visually.


Tuesday, February 17, 2015

Saturday, February 14, 2015

Maldran

So this is my first hardcore character figure sculpt in several years.  I really wanted to sculpt when the figure sculpting\ecorche class was still fresh on my mind.  So this is a character from the most recent draft of my story.  She's the sniper and pilot for the ship that our main characters sail on during the book, although previously she was a pirate working for various and sundry unsavory crews.


This is also the first test run of some second-hand LED lights I purchased as a christmas gift for myself :)

So I was definitely going for a Steam Punk look here.  I'm generally pleased with the figure, although looking at it now I'm still upset by a few mistakes I clearly made.  But I still think I'm making progress, I just wish I had more time in general to sculpt and develop as an artist.

Saturday, July 5, 2014

Ecorche!

So recently I took an Ecorche class at Pixar, taught by Alicia Ponzio.  The class was amazing - we started by sculpting a full skeleton, and then on half the skeleton we built up each of the major muscle groups (I'll post pics of this sculpt soon).  It was an intense class, a 3 hour session each wednesday for the last 4 months.  I worried that I'd forget most of it if I didn't practice, so I decided to create my own ecorche at home, and try doing a female figure instead of male.

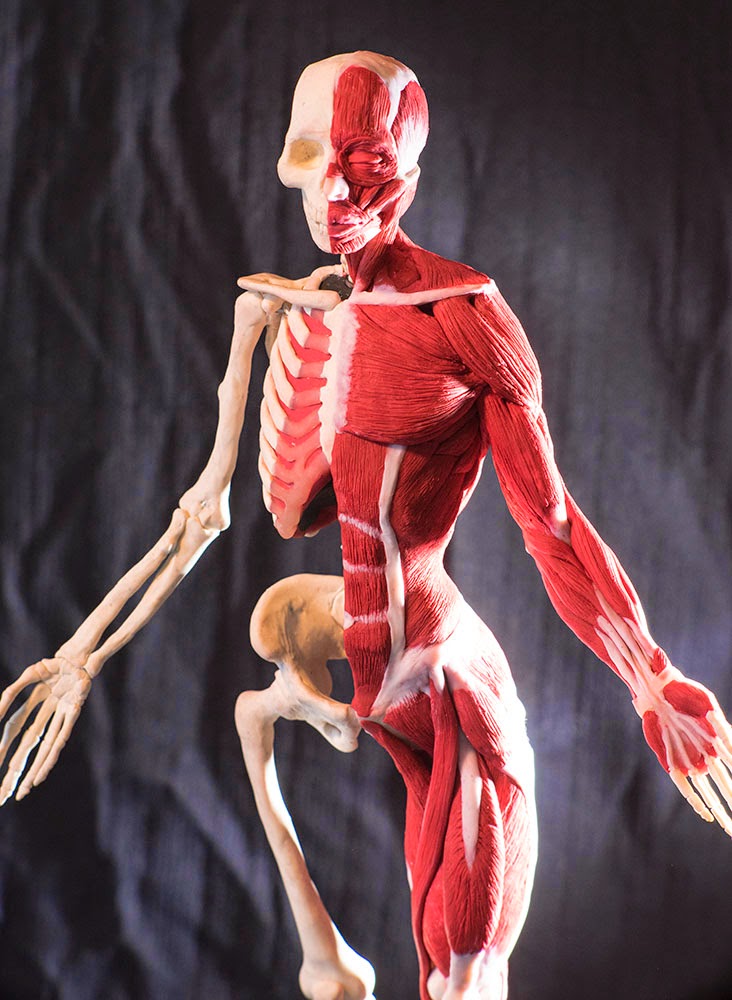
So I set forth creating a polymer-clay skeleton - and after about a month of trying to do free-floating ribs, I gave up and did a solid ribcage as you'll see here.  I also struggled with making mistakes in my initial skeleton (the spine didn't arc forward enough, the spinus processes (processi?) were far too exaggerated, fat 'cankle' bases to her tibias) and since polymer clay is a far less forgiving medium I had to compromise a few times in order to finish in reasonable time.  I did hack in and shave down the cankles to a less egregious state (still a bit fat, perhaps) but the lower leg muscles and ankle details are sadly mushy due to this late-game fix.

She also ended up more muscular than your average female - even than the average 'athletic' female - this one is a body-builder \ long-distance uphill cyclist.  But I'm alright with that, it will be useful for future reference to see more exaggerated muscles.

As an aside, this is the first sculpture I have cured using my brand new labcorp oven - it's a forced-air convection oven that is PERFECT for polymer clay.  It bakes at a perfectly even temperature throughout, and even tiny extremities don't burn or even discolor after extended baking.  It's perfect.  Did I mention it's perfection?  After years of dealing with damaged or ruined sculptures cured in conventional kitchen ovens, I am thrilled to know that from now on I have something that won't wreck hours and hours of painstaking work.


Wednesday, May 7, 2014

A long term side project -


So it's been a long time since I posted anything.  Life has been crazy, hard, and has kept me from doing too much sculpting.  Some time last year I started working on this 3d project so I could better learn Zbrush and Maya - and it was a rather intense learning process I must say.  The sculpting in Zbrush was fun but very difficult, but getting the Zbrush work through to final render was harder.  Still, by the end, I had a nice smooth and predictable pipeline, so I was able to iterate again...and again...and again - which was both good and bad.

She's been 'mostly done' for months now, so I decided I should finally wrap it up and post some images.  I gave up on rendering the 3d particulates and just painted those in, but otherwise these images are just what the renders looked like, with some color re-balancing.

Tuesday, July 31, 2012

Jaarl Sculpt


 Latest sculpt for the War of Ashes franchise.


Monday, January 17, 2011

Another fuzzy viking guy


Latest sculpt for Josh from my work. Fuzzy liddle guy.

Tuesday, December 21, 2010

New Sculpt


This one was fun because I really enjoyed the whole process of character creation. You can visit my digital painting blog to see the original design.

Monday, October 18, 2010

Pele (finally!)


After wrestling with different ideas to light this sculpture, after attempting a couple of sculpted heads, I decided that this project couldn't be done proper justice with sculpii. If I used UV light to make it glow I couldn't have gotten the nice, rich reds (UV light makes reds go pink) and if I used internal LEDs to light it then I'd never have gotten an even glow, nor could I light delicate things like fingers or arms. I'd been meaning to learn Zbrush anyway, so this project provided a great opportunity to do so. It's been a major battle, taking far longer than a physical sculpture would have taken me - and these renders are a product of 6 different software packages (Zbrush, Maya, Modo, Photoshop, Painter and UVLayout). Yowza. The renders have very little doctoring in photoshop, mostly I used Painter and Photoshop for creating and applying the textures you see on the model.